
By Marci Liroff
As many projects are asking for you to self-tape your audition as a form of pre-screening, many of you have asked how to self-tape your auditions. For some, the mere idea of this can be daunting. I urge you to get comfortable with doing this. It’s not as hard as it may seem. If you think about it, you’re actually the actor, director, and producer of your own audition! You are finally in control of your audition!
Here are some instructions that you should follow.
Pay attention to ALL of the instructions that the CD or website gives you. If they tell you to do it a specific way, DO IT THAT WAY!
Know the material. Be as off-book as possible so that you can interact with your scene partner (who’s off-camera). Try to find a good reader – it’ll really help your audition. It’s ok to hold your sides, but we don’t want to see you literally reading off the page.
Check out my article “Self-Taping Using your iPhone” if you’re going to use your phone.
TECHNICAL STUFF
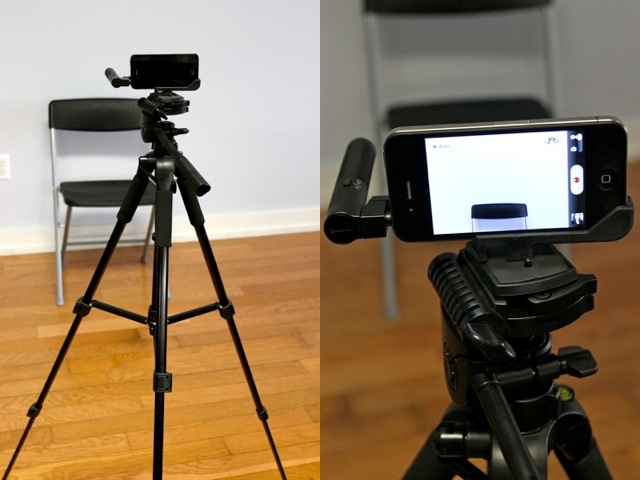
TRIPOD:
This is important! Make your audition as professional as possible by attaching your camera to a tripod. Nobody wants to watch an audition on a hand-held camera. If you don’t have access to a tripod (or can’t borrow one!), prop your camera on a table on top of some books so that it matches your eyeline (never shoot under your chin – that look isn’t good on anyone!)
Here’s a tripod adapter for your iPhone
LIGHTING:
The best thing is to use natural light. Make sure you’re not shooting TOWARDS a window or the light, but that the natural light is actually lighting YOU! If you don’t have natural light, then get some appropriate lighting. You can actually use lamps if you don’t have real lights. You can even use those wonderful large globe Chinese Lanterns (w/the white shades) – those throw a lot of nice soft light.
Go onto YouTube and search for “3 point lighting“.
You’ll get A LOT of videos how to do this. This will make your video look very professionally done and you can even do it on the cheap if you’re going to be doing this at home a lot. Go to Home Depot and get some “work lights”, and you can fashion a stand for them.
One of my Twitter followers just sent me a link to Cowboy Studio which has inexpensive lighting packages.
Make sure you “white balance” your camera before you start shooting. Many cameras these days have an auto-white balance. If yours doesn’t, check the instructions and figure out how to do it. In many cases, you can just hold up a white piece of paper about 5 inches in front of the lens and that’ll do the trick.
THE BASICS:
1. Find a quiet and well lit room.
2. Have the actor stand in front of a blank white, blue or grey painted wall. You can always use a plain sheet (no prints please).
3. Have someone other than the actor (the “reader) reading the supporting lines off camera. Do not attempt to do a scene by yourself unless it’s a monologue. Even then, have a friend operate your camera. Have your “reader” stand RIGHT NEXT TO the camera – almost hugging the tripod. EYE LINE! This is very important. So often the actor is reading to a partner that is SO far away from the camera, all we see is his profile. Make sure the actor looks at the reader during the scene and not directly at the camera.
4. You want to frame CHEST UP – not too much head room. Make sure we can see your face. You should stand about 3-5 ft. from the camera. Some projects ask for a full body shot as well to include before or after you do your scene.
5. Camera should be at eye level or just slightly above, NEVER underneath your chin.
6. Record a test sample first and see how it looks and sounds on the computer first to make final adjustments before taping the scenes.
7. When you are ready to record the scene, make sure the actor adds a verbal “slate” first by saying their name, the city they are from and role they are reading for. I also like to know how tall you are. Make sure that your slate is a SEPARATE take from your audition scenes. Don’t just roll from your slate right into the scene – that’s an amateur move. Some CDs request a slate on a piece of paper w/the pertinent info. Just make sure we can READ IT! Edit your slate and your audition together into one video file.
9. Record the scenes 2 or 3 times(or as many times as you need), pausing between takes so that you can pick the best one once youʼve had a chance to review them. Only include your best take.
10. Make sure your audition is labeled with all your contact info clearly on the clip – you can do this before and after – it never hurts to be sure. This is very important. We need to be able to reach you if we want to call you back or give you re-direction.
You can also self-tape from your webcam on your computer (a video camera is better, so ONLY do this if you have no other options). If you’re going to do it this way, I suggest you raise your laptop up a bit so that it’s not shooting “up” at you with an unflattering angle. You can also practice your upcoming auditions with your webcam and play them back so you can see what’s working and what’s not!
There you have it! Have I forgotten anything? Please let me know what works for you in the comments section.
Make sure to check out my new online course “How To Audition For Film and Television: Audition Bootcamp”. You can view it on your laptop or your mobile device and your subscription gives you lifetime viewing privileges for this course. I’ll be adding lectures throughout the year.
Glad you’re here – Marci


I love that this blog includes links to glossary terms and resources. You rock, Marci!
May I add that I purchased an HD Flip camera for my self submissions, and it works amazingly well for these things. The audio and video are really great, even from across a naturally lit room. It attaches to a tripod, and has its own USB output that plugs directly into the computer. It comes loaded with basic editing software which is very useful.
Excited about your blog – I’ve subscribed!
Thanks Erin! I’m learning as I go!
Thanks for this! The eye line is SO important, and it’s such a great idea to do a test first to look over lighting and sound (and of course, the work!) before doing takes that you will choose to submit. And the three point lighting just makes sense, but not always thought of.
Also, having a partner to read with makes more moments of work for both people!
Thanks for all the knowledge and reminders! 🙂
You’re welcome Anne.
This is Great info, especially these days when everything is electronically much speedier…the test run is of so valuable, for when if it does’t work the opportunity to do over with the self edit helps one grow . Thank You for great advice! 😀
You’re so welcome Denise. More to come. Stay tuned!
Thanks for this blog! Since I am in London at the moment, I have been wondering about “self-taping etiquette”. I love how detailed and organized your entry is. You made it easy to understand without compromising the content. Thank you for taking the time! 🙂
You are so welcome. Stay tuned for more.
How am I JUST discovering your blog? Thank you for all of this!
I only started it a week ago!!
Great stuff Marci! This is one power-packed blog. A lot of super helpful info. I’m finalizing a new entry on getting started out in flyover country (don’t know of that term is relevant anymore w/technology) and this blog is PERFECT for anyone who is (and should be) planning on creating a digital acting profile. Simple, effective and professional advice. I’m proud to have you as a friend, collaborator and teacher. Cheers from PA.
Thanks Marci, great tips! Gem xx
This list is spot on! In fact it mirrors the one we provide for the self-tape online castings we host and which is the fruit of feedback from over 100 Casting Directors who’ve used our service. So consider Marci’s guidelines to be the industry’s.
One difference: given that our system automatically attaches your information to your video, we recommend to NOT slate (either verbally or in writing) because you’re only wasting the CD’s time in that case.
Marci covers that point as well though: “Pay attention to ALL of the instructions that the CD or website gives you. If they tell you to do it a specific way, DO IT THAT WAY!”
Yep Clementine, you’re right and each website gives you specific instructions on how THEY want it so I suggest you always follow those instructions to a “T”. Thanks for your feedback.
A friend and I started biweekly self-tape sessions. We pull sides from old auditions or ShowFax and tape each other. Then we watch and discuss. We are getting wonderful audio and video quality by using an iPhone 4 on a tripod with a mount/stand for the phone (ie. $20 “Glif”, but there are many), and a $40 directional mic. Just calculate the time of day right and no lighting is needed.
This may be a bone-headed question, but how do you send the entire clip to your computer for editing? On mine you can only tape for a limited time – i.e. the file is too big to send. Thanks!
Not bone-headed at all! I had to find a YouTube tutorial myself. You connect the phone/camera to your laptop via a USB drive, and if you are on a Mac, open the app Preview. Then click File, Import from iPhone, and all your iPhone files will be listed. Just click import!
I currently have iPhone 5. I got a glif & tripod. What brand/type directional mic did you get & how did you connect it to the phone?
http://marciliroff.blogspot.com/2013/05/self-taping-your-audition-using-your.html
Another great advice, as always! Very useful tips.
Thank you Marci!
A helpful post. When you request self-tape auditions do you tend to request more auditions then you would in person auditions? Do you tend to watch the auditions all of the way through or do you know pretty quickly whether that person works or not and then just click through to the next audition?
Self-taped audition requests are usually from those out of town (not in the L.A. area). I know pretty quickly if someone is right. I view all auditions – but not all the way through if they’re not right.
Marci Liroff recently posted…BEWARE OF THE INTERNET
Do you mind if I quote a few of your articles
as long as I provide credit and sources back to your webpage?
My website is in the exact same niche as yours and my users would certainly benefit from some of the
information you provide here. Please let me know
if this okay with you. Appreciate it!
Teodoro recently posted…Teodoro
What’s your site? Pls send a link.
Getting a good reader is always my biggest challenge.
Thank You. This was very helpful.
What a great post, thank you so much!
I had a few questions:
-How about when there is physical interaction with the partner/reader (“She hugs him, he slaps her, or even actions like he rolls on the floor, etc”) :
do we still do it even it we know it will be off-camera, do we “pretend” to do it, do we skip it?
-How about props? (“she writes on a notebook, he plays with his keys, etc”): is it better to bring props, do it with imaginary ones, or just not do it?
Thank you!
Good questions Lena. Sometimes we pick a scene that has too much action for an audition so you just have to “cheat it” by ignoring it. You can’t fake a hug when there’s no one there to hug so just don’t do it. A slap you can certainly do. Don’t roll on the floor though.
In terms of props, most casting people don’t welcome props in your audition because it distracts from the scene. A good rule of thumb is: unless the prop plays a significant part within the scene and is referred to (like you NEED it to make the scene work), don’t use it. and don’t use imaginary ones.
You can use your sides when you need to “write on a notebook”. Most casting offices have no problem with you using your cell phone within a scene.
This is actually very useful, I’ve always heard about self-taped auditions but I never thought they would be able to land you a job. I guess it’s true what they say, you don’t have to be in school to learn something new. Thank you, I will take and use this advice in the best way I can!
Thanks for all the tips and advice. Appreciate the links and info for self taping.
Thanks Marci! Great tips! Very, very helpful!
Great amount of information and guidance. Thank u!
A very, very, helpful article. Many thanks. Next…the website I will construct!